Why and how to change the payment method on Oculus Quest 2?
If you're like the total majority of people, you probably use your personal bank card as your primary form of settlement. However, there may be times when you need to put something else as your financial data on Oculus Quest 2. Maybe you want to use a different account, or perhaps you're simply having trouble with your current one.
In any case, changing your payment method on Oculus Quest 2 is a relatively transparent process. In this article, we'll walk you through the steps on how to do it.
Reasons for changing your payment method on Oculus Quest 2
Like the vast majority of consumers, you’ve probably signed in with a card. And while there's nothing inherently wrong with it, there may be some advantages to going in other directions with it.
For example, if you're concerned about security, you may want to use something like PayPal which offers an added layer of protection. Or, if you're worried about the potential for fraud, you might have a preference for a prepaid card that you can load with a very particular amount of money you’re ready to spend.
Another reason you may want to change the Oculus payment method is if you're thinking about their security practices. If you're concerned about this, you might consider using a different way to buy anything there, that doesn't require you to store your personal financial information within this platform.
Finally, you might simply prefer the convenience of using something different. For instance, if you have PayPal, you may find it easier to pay for your Quest 2 using this way rather than a card.
How to change the payment method on Oculus Quest?
Here's a major general guide:
- Open this application on your device and go to Settings.
- Choose Payment Methods.
- Select the one you want to use and enter the necessary information.
- Click Save and you're all set!
It is pretty simple, and it gives you the flexibility to use the system that works best for you. Now, let’s specify.
How to add a card to Oculus Quest 2?
Thankfully it is fairly easy to complete.
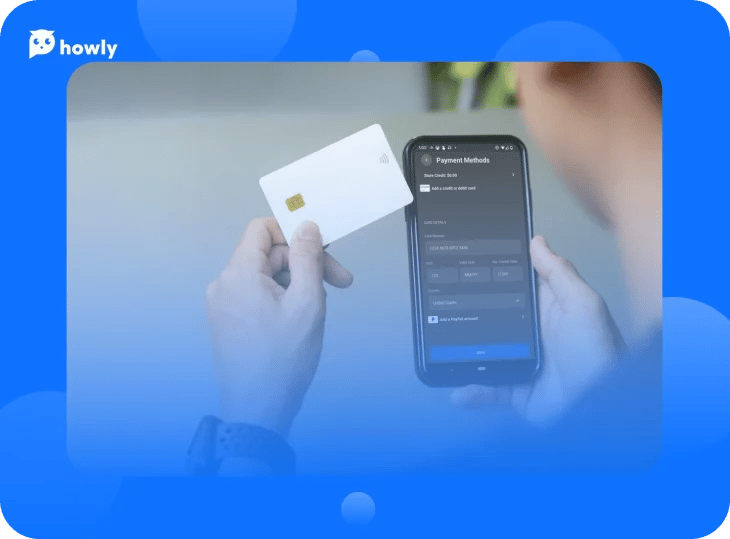
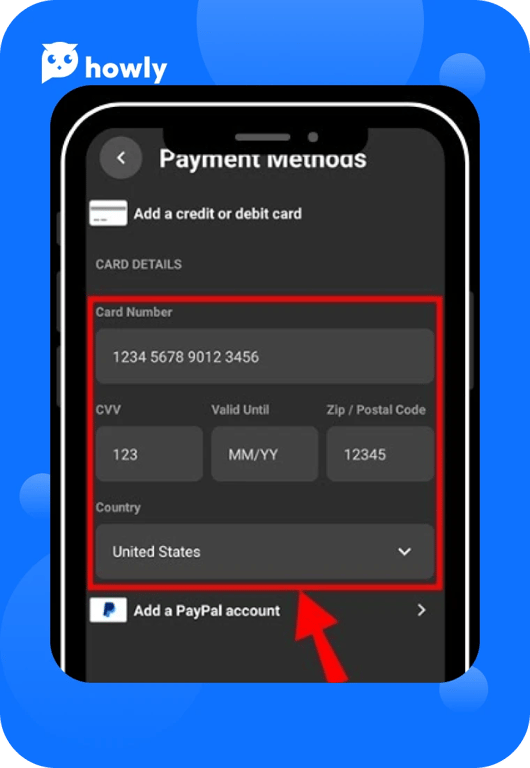
- First of all, open the application on your device and choose the Settings icon from the menu. Next, select the Payment tab and then Add Payment Method. You will then be prompted to select something from the list of available options, such as a personal card, PayPal, or Oculus Store Credit.
- Once you have picked the needed point, you will be asked to enter all the necessary details, like name and other data.
- As soon as you have provided everything needed, click the Submit button to complete the process. Your payment method will now be available for use on your account.
How to remove credit cards from Oculus Quest 2?
Deleting is a simple process as well.
- First, open the app on your phone and go to the Settings option.
- Next, select Payment Methods from the list of options. This is the place where you will be able to view any financial info associated with your Oculus account.
- Choose what you want to delete and then confirm the process.
- Once the payment method has been removed, it will no longer be associated with the platform.
Thousands of people have already got their AI Assistant answers on Howly.
Conclusion
In conclusion, changing your payment on Oculus Quest 2 is a simple process that can be done through the settings menu. You have the option to add or edit different ways to pay, including personal bank cards and PayPal. Doing this will not affect any ongoing subscriptions or purchases. This feature allows you to easily manage your money options and ensure that you are always able to make purchases on this platform. Other than that, you can turn to the Howly experts in case you need additional consultation.